Seed Sowing Indoors (RHS guide)
Posted:7 February 2016
Sowing seeds indoors allows tender plants to be started off earlier in the season. When they have grown into young plants, they can be planted outside in the garden or vegetable plot once the weather is warm enough.

The RHS websites Guide to Seed Sowing Indoors:
Many vegetables, including tomatoes and runner beans, can be started off indoors. Some, like celeriac, need a long growing season to bulk up, so are best started off indoors rather than direct outdoor sowing. See RHS Grow Your Own for advice on growing specific vegetable crops.
Annual bedding plants, such as morning glory (Ipomoea), sweet pea (Lathyrus odoratus), marigolds (Calendula and Tagetes species) and sunflowers (Helianthus cultivars) can be started off indoors to create flower displays for the summer.
Some tender perennials, such as cannas, begonias and Diascia can also be sown from seed indoors, but generally take two years to reach flowering size. Perennials live indefinitely, so a slow start pays off in the long run!
If you have a heated greenhouse or enough space and light in the house, you can sow some things indoors as early as January (e.g. radish, chicory and sweet peas).
Otherwise, most crops and flowers are started off indoors in February or March, for planting out in May or June when the risk of frost has passed.
Containers
- Small seeds are generally sown into shallow seed trays and pricked out (transplanted) into larger pots while still at the seedling stage.
- Slightly larger seeds can be sown into individual modules in a modular plug tray, so limiting transplant shock.
- Large seeds can be sown individually into 9cm (3.5in) diameter pots.
- Old containers should be thoroughly cleaned before use.
Compost
- Use a standard, proprietary soil-based or soil-less seed compost for seed sowing. These are finely milled and contain few nutrients, which could damage seedlings.
- Fill the container with compost, level, firm gently and water well.
Sowing
- Many seeds require specific sowing treatments, such as light-exclusion or scarification (scratching or nicking the seed coat), so check seed packets for specific instructions.
- Small seeds can be scatter-sown thinly over the surface of the compost. Very small seeds can be mixed with fine, dry sand before sowing to obtain an even distribution. After scattering, sift a layer of compost or fine vermiculite over the seeds.
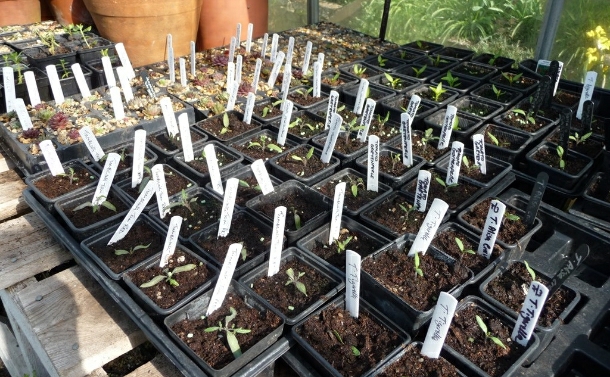
- Larger seeds can be station-sown, pressing each seed individually into the surface of the compost a couple of centimetres (1in) apart in a seed tray. If using a modular plug tray, sow one seed per plug. Sometimes, two seeds are sown per plug and the strongest seedling selected, discarding the weaker one.
- Label, lightly water again and cover with clear polythene or a sheet of glass, or place in a heated propagator with a lid. Maintain a temperature of around 18ºC (64°F), unless seed packet states otherwise.
Aftercare and growing on:
Aftercare
- Check daily for emergence. Once germination occurs, the glass, polythene or propagator lid should be removed to increase ventilation.
- Keep the compost just moist at all times to maintain steady growth until the seedlings can be pricked out (transplanted) to bigger pots.
Pricking out
- To prick out seedlings, loosen the compost around their roots with a blunt stick or ‘dibber’ and lift the seedlings individually by holding one of the true leaves (not the first seed leaves produced just after germination) between finger and thumb.
- Try to keep as much compost around the roots as possible and use the dibber to make a hole for the seedling in its new pot of compost.
- Pot each seedling into a 9cm (3.5in) diameter pot. If the seedlings are leggy, bury them slightly deeper (up to the first pair of leaves) in their new pot.
Plug plants
- Seeds sown into modular plug trays can be left without pricking out until their roots fill the compost in each module. Small plugs need individual potting on into 9cm (3.5in) diameter pots. Larger plugs may become substantial enough to plant directly into hanging baskets or display tubs.
Growing on
- Water small seedlings and plug plants with a watering can fitted with a fine rose, to avoid damaging them. Larger seedlings and more mature plugs can be watered using a coarse rose, as flooding is necessary to soak the entire depth of compost and roots.
- Feed pricked-out seedlings and plug plants with a balanced liquid fertiliser applied fortnightly in most cases. Larger plants may need weekly applications and tiny seedlings may only need monthly feeding.
- If sowing into larger plug trays, try putting controlled release fertiliser granules or a chicken manure pellet in the bottom of the plug before sowing to provide plants with nutrients as their roots grow down into the compost.
- If ornamental seedlings become lanky, pinch out their shoot tips to encourage branching. If necessary, several ‘pinchings’ can be done before the plant is ready to go outside. Avoid excessive legginess by growing plants in bright light and avoiding overly warm conditions.
Hardening off
- Once the weather is warm enough and plants are large enough to be moved outside, they will need gradual hardening off to outdoor conditions.


